This Oracle Weblogic GridLink Data Source is an advanced high-availability solution which is specifically designed for Oracle RAC (Real Application Cluster).
In the earlier recipe we have learnt about the multi Weblogic Data Source option, which has the advantage to be a DB vendor agnostic solution; that being said, a multi Data Source has some limitations too.
1. First: the configuration is complex. An Oracle RAC multi Data Source requires n+1 JDBC modules, where n is the number of nodes in the cluster.
2. Second: the configuration itself is static and requires administrative intervention to add or remove Data Sources, when changes are made to the RAC cluster topology.
3. As far as it concerns HA, a multi Data Source uses connection polling as mechanism to determine the viability of individual JDBC connections. Although effective, performing SQL operations on individual connections comes at the expense of additional runtime overhead, and potentially delayed detection of RAC node failures.
A GridLink on the other hand offers the following benefits:
- Load balancing: A GridLink Data Source uses the advanced Oracle Fast Application Notification (FAN) events to distribute connection requests across RAC instances.
- Fast Connection failover: A GridLink Data Source uses Oracle Fast Connection Failover (FCC) to quickly detect database failures ensuring all connections remain valid.
- XA affinity: this is a performance feature that ensures that all database operations performed on a RAC cluster, within the context of a global transaction, are directed to the same RAC instance. Affinity will be established based on the global transaction id, instead of by individual Data Source, to ensure that connections obtained from different Data Sources that are configured for the same RAC cluster are all associated with the same RAC instance.
|
Configuring a Oracle Weblogic GridLink does not require to configure individual Data Sources for each cluster node. In the GridLink configuration screen, you can enter all the RAC node details at once. Targeting and testing can be done via the WebLogic console, just like for the generic Data Source. |
In order to configure a GridLink Data Source, from the left handed tree expand the Services node and click on Data Sources. Next to the New, button press the “∨” button to reveal the three menu options and select GridLink Data Source as depicted by the following picture:
In the next screen, enter the GridLink Data Source details:

If you have selected an XA compatible driver, the next screen will inform you that the Data Source will support global transactions and the 2PC protocol. Otherwise, this screen will ask you which option to use for handling transactions.

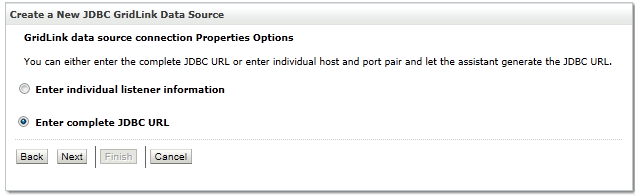
Click Next. In the following screen, select the option “Enter complete JDBC URL” as we are going to provide the complete JDBC URL of the RAC:
Click Next. In the following screen you have to enter the complete JDBC URL along with the database username and password and the protocol used for communication (default TCP):
|
The JDBC URL uses Oracle Single Client Access Name (SCAN) addresses to specify the host and port for both the TNS listener and the ONS listener in a single row. A GridLink Data Source containing SCAN addresses does not need to change if you add or remove Oracle RAC nodes. |

The format of the JDBC URL is the following
jdbc:oracle:thin:@{scan-listener-host}:{scan-listener-port}/{service-name}
In our example, we are connecting to a service name “rac_srv” hosted on “dbhost” so our JDBC URL is:
jdbc:oracle:thin:@dbhost:1521/rac_srv
One way to determine the SCAN host/port is by connecting to any of the RAC instances in the cluster and from SQL-plus issue the following command:
SQL> show parameter remote_listener NAME TYPE VALUE ------------------------------------ ----------- -------------------- remote_listener string dbhost1:1521
Complete the above form by entering the username and password for the database connections and click Next. In the following screen click the Test All Listeners button to verify that the configuration entered is valid.

If the configuration is valid, a green “success” message is displayed. If a red “failure” message displays instead, use the Back button to fix the problems with the configuration. Once the test succeeds, click Next.
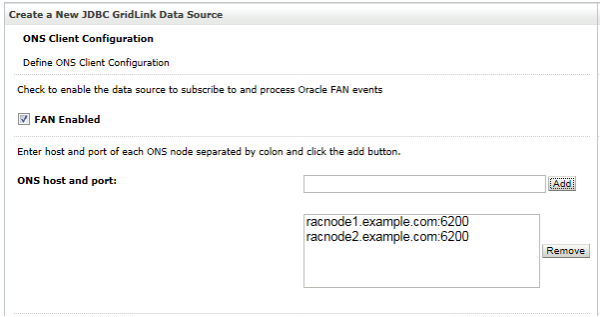
As next step, you have to enter the ONS client configuration. This step allows the data source to subscribe to and process Oracle FAN events; this is essential to distribute connection requests across RAC instances.
As you can see from the following picture, we have entered as ONS host and port the following pairs:
racnode1.example.com:6200
racnode2.example.com:6200
In order to be able to fill the ONS Client Configuration screen, you will need to know your Oracle Notification Service (ONS) hosts and ports. ONS configuration is controlled by the ONS configuration file, ons.config, located in $ORACLE_HOME/opmn/conf. This file tells the ONS daemon how it should behave. Configuration information within ons.config is defined as simple name and value pairs. Here’s an example of an ons.config file:
localport=6100 remoteport=6200 nodes=racnode1.example.com:6200,racnode2.example.com:6200
With this information at your hands, in the ONS Client Configuration screen select “FAN Enabled”. On the same screen, enter each ONS host and port and click on the Add button. Use the DNS name of each host, followed by a colon, and then the ONS port number
On the next screen, click the Test All ONS Nodes button.

You should see a green “success” message for each ONS Node. If not, click the Back button, fix the configuration, and try again. When you are successful, click Next and select the target server or servers for the Weblogic GridLink Data Source and click Finish.